Skip to contentTheCollectorTheCollectorTheCollectorTheCollector
  • Ancient History
  • History
  • Art & Artists
  • Philosophy
  • Mythology
  • More
    • Interviews
    • Answers
    • Religion
    • Travel
    • Stories
    • Collecting
    • Film
    • News
    • Maps & Resources
    • Videos
Write for us
Hamburge IconHamburge Icon
›
TheCollector
Topics
Ancient HistoryHistoryArt & ArtistsPhilosophyTravelInterviews
ReligionAnswersStoriesFilmNewsMaps & Resources
About
About UsWrite for usAuthorsOur TeamJob OpeningsContact Us
Follow your Favorite Topics.
Sign up to our Free Weekly Newsletter
hello@thecollector.com
linkedinflipboardfacebooktwitterinstagrampinterest
Copyright © 2025 TheCollector
Terms & ConditionsPrivacy Policy
Home›Maps & Resources

Map: Battle of Gaugamela (Phase 2)

Map showing the second phase of Battle of Gaugamela, 331 BCE between the armies of Alexander the Great (blue) and Darius III (red).

Download this Map

Downloads 0 • High quality image

Map: Battle of Gaugamela (Phase 2)
View Full Image

Download this Map

Downloads 0 • High quality image

Credit this Map

Map: Battle of Gaugamela (Phase 2), provided by TheCollector.com

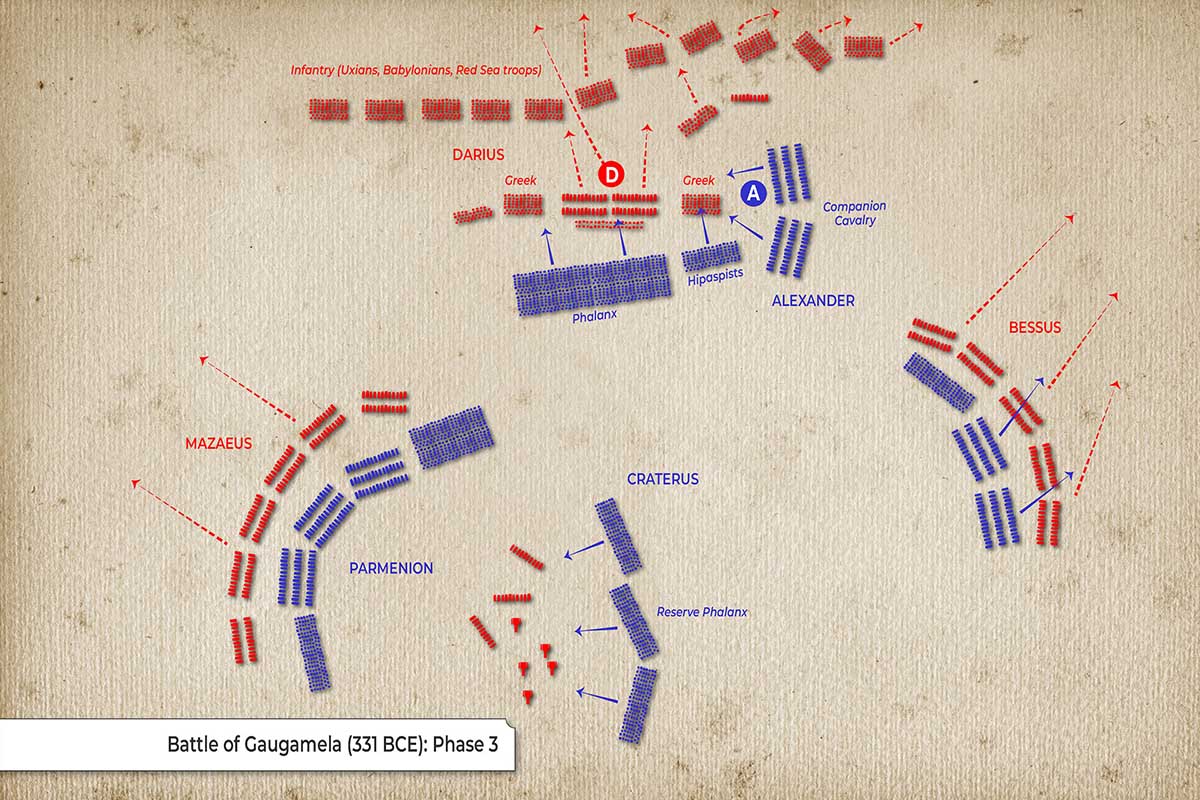
This map depicts the second phase of the Battle of Gaugamela. Here’s a brief summary of what is shown in the map:


  • Alexander drives his cavalry toward a gap in the Persian center, aiming for Darius.

  • The Greek phalanx in the center advances while the reserves pivot to counter the Persian scythed chariots that have slipped through.

  • The Persian general Mazaeus crushes in on Parmenion; Bessus tries to envelop Alexander.


Sector / CommanderForcesManeuver (Phase 2)
Right – AlexanderCompanion Cavalry, Hypaspists, AgrianiansWedge thrust into center-right gap
Center – Craterus & PhalanxMain phalanx, reserve phalanxAdvance; open lanes for chariots; reserve wheels to support
Left – ParmenionThessalian & allied cavalry, ThraciansDefensive, compressed inward
Persian Center – DariusPersian cav & Greek mercenariesAttempts to seal breach


Overview: Macedonian line holds; wings are contested, but Alexander’s breakthrough tears open the Persian center, setting up Darius’s flight in the next phase.

Share this Map

Tags

  • Achaemenid
  • alexander the great
  • Battle of Gaugamela
  • Darius III
  • Historical Maps
  • Persian Empire

Related Maps

Map: Battle of Gaugamela (Phase 3)
Map: Battle of Gaugamela (Phase 1)

Related Articles

9 Battles That Defined The Achaemenid Empire

by Edd Hodsdon

4 Battles From Alexander the Great’s Legendary Persian Campaign

by Vedran Bileta

Follow your Favorite Topics.

Sign up to our Free Weekly Newsletter