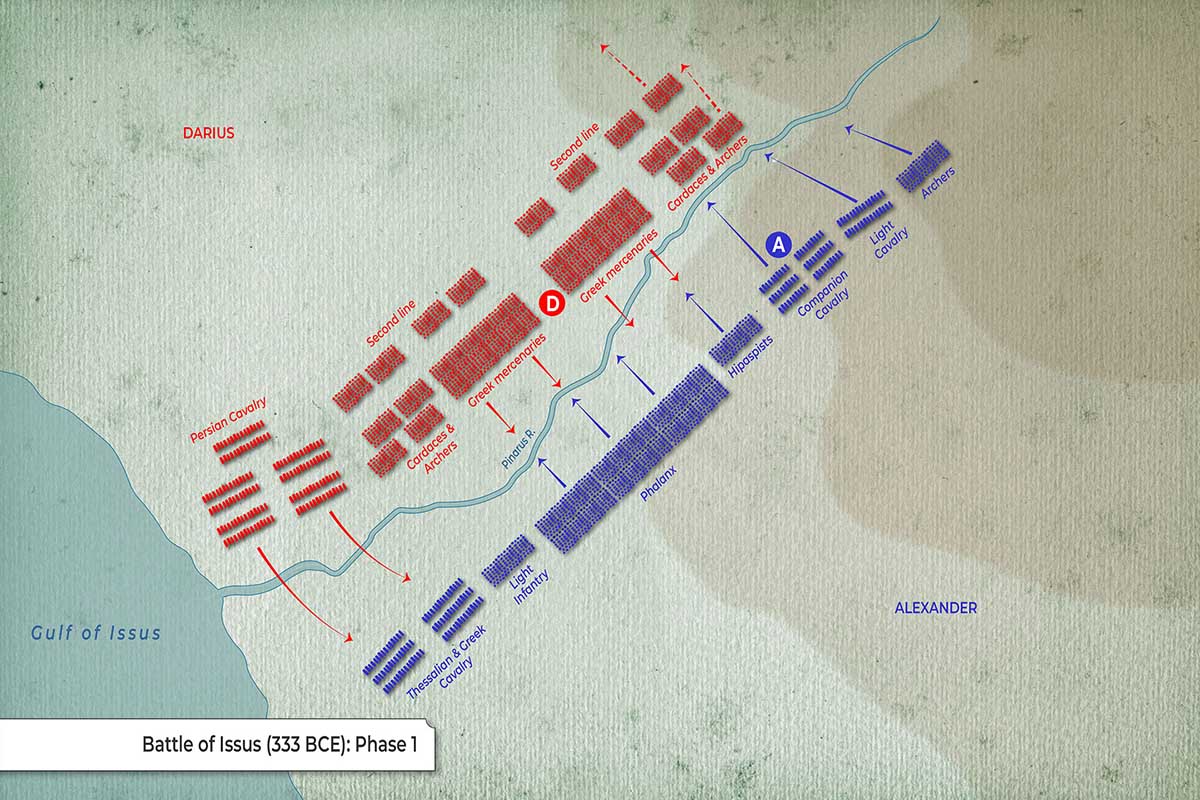
This map depicts the initial deployment and opening movements of the Battle of Issus (333 BCE), showcasing the armies of Alexander the Great and Darius III on the battlefield. It illustrates the critical positioning of forces along the Pinarus River, highlighting Alexander’s tactical response to the Persian numerical superiority and the terrain.
Alexander’s Initial Deployment (Blue)
Alexander’s forces are deployed in a disciplined line, designed to counter the Persian cavalry on the coast while preparing a strike force on the right.
| Flank | Movement |
| Left Flank | Composed of the Thessalian & Greek Cavalry, positioned near the Gulf of Issus to prevent a Persian breakthrough along the shore. |
| Center | Features the heavy infantry units of the Phalanx, supported by Light Infantry on their left and the elite Hypaspists on their right. |
| Right Flank | Led by Alexander (designated ‘A’), this wing consists of the elite Companion Cavalry, supported by Light Cavalry and Archers, positioned for a decisive charge across the river. |
Darius’s Initial Deployment (Red)
Darius III utilized his massive numbers to form a deep defensive line, utilizing the Pinarus River as a natural barrier.
| Flank | Movement |
| Right Flank (Coast) | A massive concentration of Persian Cavalry aimed at overwhelming Alexander’s left and flanking his army by the sea. |
| First Line | Composed of Cardaces & Archers on the wings, with a central core of elite Greek mercenaries. |
| Second Line | A deep reserve force positioned behind the main line to bolster the defense. |
| Command | King Darius (designated ‘D’) is positioned in the center, directly behind his most reliable Greek mercenary units. |
Opening Movements
| Tactical Movement | |
| Persian Cavalry Charge | The map shows the Persian Cavalry on the right (near the Gulf) initiating a forward movement (red arrows) to engage the Thessalian and Greek cavalry. |
| Macedonian Advance | The blue arrows indicate the general advance of Alexander’s entire line toward the Pinarus River. |
| Decisive Strike | On the right flank, the Companion Cavalry (led by ‘A’) is poised to strike the Persian left-center, a maneuver intended to break the Persian line and reach Darius. |


