The eight-month-long Satsuma Rebellion was the last great rebellion of feudal Japan, quite literally the last stand of the disaffected samurai warriors against the new imperial government, put in place by the Meiji Restoration. Undeniably, it was one of the most noteworthy incidents during Japan’s transition from a feudal regime to a modern state. There were various reasons for the Satsuma Rebellion’s failure, including inferior weaponry, insufficient manpower, and an outdated warrior ethos.
Samurai Warriors

The samurai warrior class has long been the iconic symbol of feudal Japan. From as early as 1180, the samurai ethos centered around the virtue of loyalty and courage. Personal honor was crucial to the point of seppuku; bluntly, “the Way of the Samurai is found in death.” This encouragement towards death was embedded in the samurai warrior code of Bushido. Unsurprisingly, and unfortunately for the Satsuma Rebellion, the sword symbolized all of the samurai warrior ideals.
After the Closed Country Edict of 1635 isolated Japan and ended the age of samurai warrior mercenaries going abroad, conflict was restricted to small-scale domestic skirmishes. This relatively peaceful era revealed the paradox lying within Bushido; the samurai warriors’ ethos became more important to their survival than the life of the warrior itself. For a warrior to survive an extended period of peace, they required a central focus outside of the battlefield. The samurai found this in their ethical code. This ethos would continue to be the center of the samurai’s worldview up until their last and greatest rebellion against 19th-century modernization— the Satsuma Rebellion — and the death of Saigō Takamori, the last samurai.
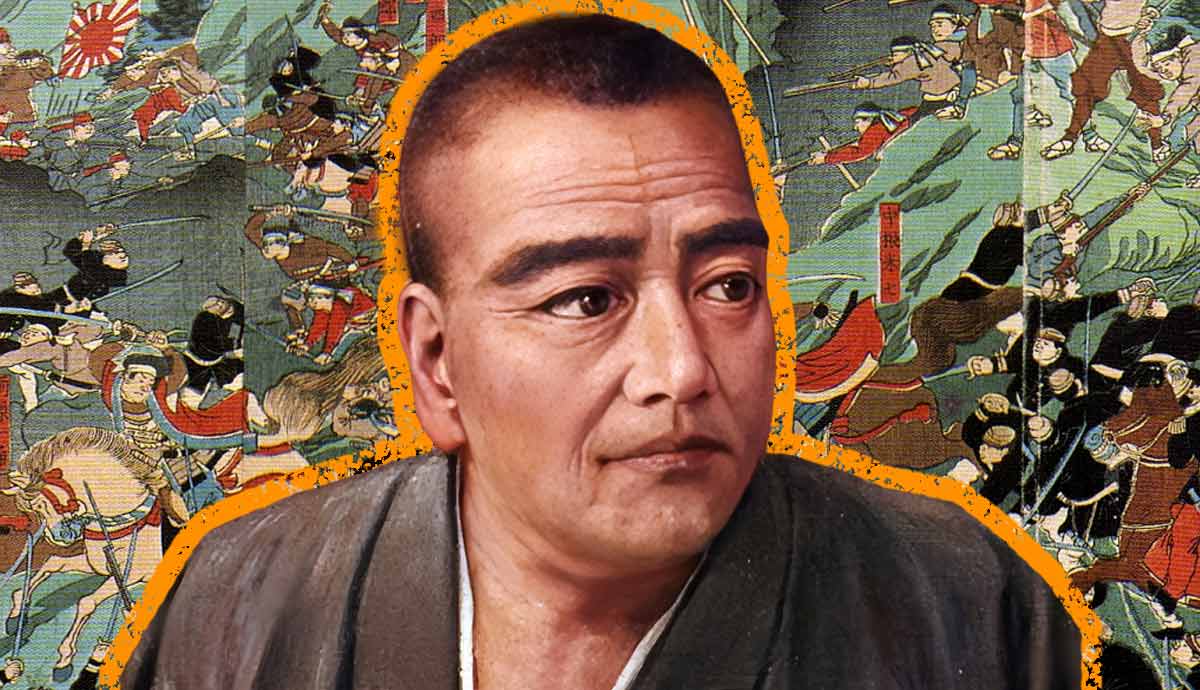
Saigō Takamori: The Last Samurai Warrior

Saigō Takamori is widely considered the “last samurai” because of how completely he embodied the samurai warrior ethos. Born in 1827, he was intensely driven to fulfill the samurai warrior ideals of loyalty, honor, and duty. As a young man, he was influenced by Mito learning, which placed a heavy emphasis on the divinity of the emperor and hatred of Westernization. This influence lessened as he aged, but Takamori retained a passionate loyalty for his nation and the samurai lifestyle until his death.
As leader of the Satsuma daimyo’s military affairs, Takamori played a key role in the overthrow of the Tokugawa shogunate and the institution of the Meiji Restoration in 1868. His role in this conflict, as well as the way in which he exemplified samurai warrior virtues, earned him a position in the new government (which he resigned in 1873) and a resounding reputation amongst the Japanese people. As described by historian E. Herbert Norman, “He combined those qualities which made him not just a natural leader of reactionaries dreaming of a return to the old regime where the warrior class lorded it over their baser fellows; they made him the very paragon of samurai warrior virtues.” His reputation also made Takamori the Satsuma Rebellion’s first choice of a leader.
The Meiji Restoration and Beginning of the Satsuma Rebellion

Ironically, the Meiji Restoration, orchestrated almost entirely by samurai, ended the privileges of the samurai warrior class through its complete reorganization of Japan’s feudal class system. A series of new laws in the early 1870s cut the samurai stipend and banned warriors from carrying katanas or dressing with their traditional topknot hairstyle. Samurai grew increasingly bitter regarding the social reforms, westernization, economic uncertainty, and the mass conscription of peasants limiting the number of samurai employed by the army. Satsuma in particular was the only domain to resist being assimilated into the government’s newly centralized state, and Satsuma samurai were especially angry that they had been key supporters of the government that was now nullifying their way of life.
Saigō Takamori’s leadership in the rebellion was instigated by two events. First, students in his Shi-gakkō samurai academy seized Kagoshima’s arsenals in February 1877, prompting Takamori to reluctantly support their actions. Secondly, he discovered a Tokyo-supported plot to assassinate him. He considered the assassination plot a sign of the new government’s questionable character and potential threat against the emperor. Throughout the subsequent eight-month rebellion, his primary goal was to force his way to Tokyo to speak to the emperor, to whom his loyalty continued unwaveringly.
General Yamagata Aritomo of the imperial army predicted three potential courses of action for Takamori’s outnumbered forces. First, to board steamers and go either to Tokyo or Naniwa. Second, to raid the Nagasaki and Kumamoto garrisons, break through Kyūshū, and proceed to the mainland. Third, to stay in Kagoshima, keep his ear to local sentiment, and take the first opportunity to cross the mainland with the people’s support. Takamori chose the more honorable but ultimately disastrous second option.
The Siege of Kumamoto Castle

Takamori besieged Kumamoto Castle, one of Japan’s three great fortifications. Japan’s traditional method of siege warfare was to fight in such a way as to bring the opposing samurai face to face for hand-to-hand combat. Even after the introduction of western weaponry, samurai ethos preferred this tactic, as did Takamori and his rebels.
Kumamoto Castle’s walls stood 20 meters tall, housed 49 turrets and six towers, stood on a bluff beside two streams that could be dammed into a defensive moat, stored months of starvation rations, and had never before been taken. In addition, the defenders merely had to await the imperial army’s reinforcements. The rebels besieged it for 55 days, during which multiple skirmishes took place.
The most pivotal confrontation unfolded at the nearby fortress of Tabaruzaka as the rebels spent eight days attempting to stop the imperial reinforcements. Ten thousand rebels and six cannons hid in the tree line on the road to Kumamoto, forcing the imperial force to take and secure three separate sections of the hill. It is estimated they lost nine soldiers for every meter taken and exchanged some 300,000 bullets each day of the conflict. The casualty percentage ranks amongst the worst for a single battle in the history of warfare.
On the Run

After failing to take Kumamoto Castle, the rebels fled to Kiyama Village. This base fell on April 21. Retreating further south, the losses sustained at Kumamoto limited Takamori to guerrilla warfare. Accounts vary, but by mid-August the rebel force numbered between 3,500 and 10,000 men. The next day, the imperials won a complete victory at the rebel stronghold of Nobéoka. Only a fraction of Takamori’s force escaped to Nagai.
At this point, Takamori gave his men the option to honorably disband. Only some 600 Shi-gakkō students declined and fought their way over Mount Eno to Kagoshima. For two weeks, they attempted to resupply their artillery; Takamori had 372 men but only 150 arms and limited ammunition. When the enemy army arrived, Takamori’s troops dug caves into the side of Mount Shiroyama as a defense against the surrounding imperial cannons.
By September 23, the constant bombardment had left Takamori with only 40 remaining men and no ammunition. His samurai fled and were hunted by imperial soldiers through the nearby hills. Somewhere in the hail of bullets, Saigō Takamori was crippled and ordered his elected second, Beppu Shinsuke, to behead him. His death marked the end of the Satsuma Rebellion as well as the symbolic end of the samurai class.
Why Did They Lose?

From the beginning, the rebels were outnumbered, outgunned, and out-financed. While imperial soldiers were armed with breech-loading Snider rifles that could fire six rounds per minute and were further supported by eighteen artillery batteries and a fleet of warships, Takamori’s samurai still preferred the traditional weapons of the sword, bow, and polearm. According to one source, the imperial army had nearly 59,000,000 more bullets at the beginning of the conflict. As such, Saigō Takamori’s best chance of success lay in preempting government awareness. However, he didn’t take the time to consolidate the resources necessary for a serious campaign.
Takamori’s second mistake lay in his failure to capitalize on the rebels’ greatest asset: disaffection in other domains. If he had incorporated other rebel groups, his reputation and experience could have organized a counterrevolution before the imperial army had time to respond. Disaffected warriors also would have supplemented Takamori’s numbers and lessened the manpower advantage held by the imperials. Many scholars interpret Takamori’s failure to do so as an indication that he underestimated the capability of the government’s conscript soldiers, as did the majority of his samurai. One of the causes of the Satsuma Rebellion was the samurais’ indignation at being replaced with peasant recruits. One of its fatal mistakes was their belief that non-samurai couldn’t make good soldiers.

Takamori’s third mistake was the siege of Kumamoto Castle. He lost time, the advantage of surprise, manpower, and ammunition, all for the honorability of direct confrontation. It gave the government time to muster a response and send reinforcements. The battle of Tabaruzaka was extremely costly; the rebels lost around 5,300 men. After that, they were forced to retreat and avoid pitched battles. In many ways, the siege of Kumamoto Castle in the first months of the conflict ended the Satsuma Rebellion’s chances of success.
Takamori’s fourth and perhaps most important mistake was the nature of the conflict: traditional samurai rebelling against advancing westernization. His men preferred katanas over guns because of their loyalty to traditional ethics and styles of warfare. In practice, the rebels lost because they couldn’t match Western weapons. The code of bushido and the samurais’ willingness to die for their cause only served to undermine the effectiveness of their military strategy when outnumbered by a better-armed opponent. In a conflict where they were outgunned and outmanned, the samurai’s emphasis on the nobility and honor of seppuku led them to sacrifice themselves too readily.
The Undoing of the Last Samurai Warriors

The Satsuma Rebellion failed in large part because the rebels’ ethos inflated their disadvantages. Saigō Takamori deeply believed in the bushido principles of honor and willingness to die for a cause. Many sources believe that one of his primary reasons for taking leadership of the Satsuma Rebellion was so that he could die nobly in battle. Historian Mark Ravina writes that as early as March 12, rebel leadership, “doubted that anyone could turn the tide of battle…but, Saigō claimed, this did not really matter. He was not fighting for victory but for the ‘chance to die for principle.’” His military strategy — and that of his samurai warriors — was driven by this goal. They overlooked their largest material problems — their lack of manpower and limited western weapons — because of Bushido’s emphasis on self-sacrifice and the sword. As such, their ethos encouraged them to ignore the very elements necessary for success.