During the Second World War, the campaign in North Africa was beset with difficulties. Both sides endured blistering heat, dust storms, and challenging terrain. The Germans’ main goal was to capture the Suez Canal, break into the Middle East, and gain access to vital oil fields to fuel the Axis forces’ continued success.
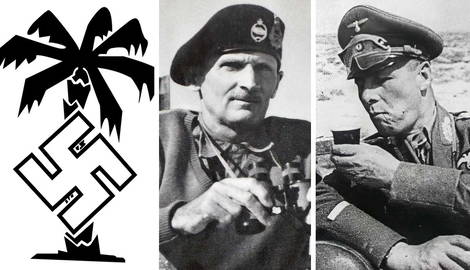
For the Allies, their mission was simple. They had to stop Field Marshal Erwin Rommel and his Afrika Korps from achieving their goal.
A previous engagement at El Alamein on the Egyptian coast had left the two armies in a stalemate, but the British and their allies had another chance, and they knew they had to make it count.
The Second Battle of El Alamein was a turning point and a deciding factor in who would ultimately win the war in North Africa.
The North African Campaign

In September 1940, the Italians launched an invasion of Egypt from their colony of Libya. Despite achieving victory, the following months would see the Italians come to the brink of defeat as Allied forces under British command took the initiative. The Germans were forced to intervene. The Afrika Korps was created and sent to relieve their beleaguered allies. Command of this army was in the capable hands of Field Marshal Erwin Rommel, who would become known as the “The Desert Fox.”
With the Germans in control, the Axis forces achieved success, but this situation could not last indefinitely. In the Mediterranean, another war was being fought over the supply lines to Africa. With eventual British superiority in this area, the Afrika Korps and their Italian allies began to feel the effects. Not only were they suffering from a lack of munitions, But Hitler was far more concerned with the German situation on the Eastern Front, where the Battle of Stalingrad – the biggest battle in history – was being waged. Any and all help that could have gone to Rommel was being diverted to the German Sixth Army, desperately trying to save the German campaign against the Soviet Union.

Rommel, however, was extremely competent and was able to use what he had to its full effect. At the Battle of Gazala (May 26 to June 21), Axis forces pushed eastwards, threatening British control of the Suez Canal.
The British Eighth Army, tasked with halting the German advance, maneuvered into a favorable position and halted the advance near a small town on the coast west of Alexandria. However, the First Battle of El Alamein was far from conclusive and is considered by historians to be a stalemate. Axis and Allied forces continued to accrue reinforcements and munitions for further engagements.
With Axis supplies being constricted, time favored the Allies, so Rommel decided to attack first and seize the initiative. This came after a series of failed counterattacks by the Allied forces. The battles of Tell el Eisa (July 10, 1942), Ruweisat Ridge (July 14–16, 1942), and the Second Battle of Ruweisat Ridge (July 21–23, 1942) all showed promise but ultimately failed to break through the Axis lines due to poor communication and coordination.

Among these failed British counterattacks, Lieutenant-General William Gott became the new commander of the British Eighth Army but was killed en route to his post. His position was filled by General Bernard Montgomery, while General Harold Alexander replaced General Claude Auchinleck as Commander-in-chief of Middle East Command.
The German attempt to break through the Allied lines followed. The Battle of Alam el Halfa (August 30 to September 5) was a defeat for the Axis forces, and they decided to fall back to their defensive line and strengthen their positions for the impending Allied attack.
Meanwhile, Erwin Rommel had become sick and had departed North Africa for rest at a sanatorium in Germany.
The Armies

The Axis army consisted of a total of 116,000 German and Italian soldiers. They were joined by 557 tanks, 192 armored cars, around 800 aircraft, 552 artillery pieces, and several hundred anti-tank guns, possibly as many as a thousand.
The Allied forces had numerical superiority, with 195,000 soldiers (possibly even more) drawn from Britain, India, Australia, New Zealand, South Africa, Greece, Free France, and local forces from Libya. They had twice the number of tanks, more than twice the number of armored cars, around 900 artillery pieces, and significantly more anti-tank guns than the Axis forces. In terms of aircraft, the numbers were similar, and the Allied forces were augmented by a small element from the United States.
The Battle Starts

The Axis positions were secured by natural features. To the north and on the left flank was the Mediterranean, while to the south and on the right flank lay the impassable Qattara Depression. A frontal assault was the only course of action for the Allied forces.
With two main directions of attack, Montgomery decided to focus on the Axis flanks, thus forcing the Axis center into a precarious position. The first phase of the battle, codenamed Operation Lightfoot, would involve infantry from XXX Corps attacking in the north and XIII Corps attacking in the south, clearing a path for the tanks of X Corps to break through the Axis lines.
The plan would be difficult and dangerous to implement, as the Axis forces had laid plenty of minefields, which the Germans nicknamed “the Devil’s Garden.” Clearing them and creating a corridor for attack would be a slow process. Only through this process, however, would Allied armor be able to penetrate the Axis defensive lines.

British armor, at this time, had yet to prove itself effective. Poor quality meant the principal tank of the British armed forces in the Western Desert Campaign, the A15 Crusader, was substandard and prone to overheating – a serious problem in the dust and heat of the desert. The British also spread tanks throughout its fighting units, intended to support infantry, while by contrast, the Germans used tanks en masse to achieve major breakthroughs through speed and firepower. The open desert was perfect for German tank tactics, and Rommel was a veteran of this kind of warfare.
The British enjoyed a superiority in the quantity of artillery and used this to their advantage. On the night of October 23/24, the Second Battle of El Alamein began with a massive bombardment, which began at 21:40 across the Axis front line. As the artillery bombardment rolled forward, sappers started their job of clearing pathways for the armored columns to follow. By the early hours of the morning, paths wide enough for tanks to pass single-file had been created, and the armor began to move. Dust kicked up by these armored columns, combined with the darkness of the night and Axis defensive fire, made it almost impossible to see.

In some areas, the fighting was extremely bitter, and the South Africans, with heavy casualties, managed to capture the high ground, Miteirya Ridge, in the center-north of the Axis defensive line, thus providing a point of control over the right flank of the German forces in the north. The rest of the Allied forces, however, were having difficulty clearing paths. The minefields were deeper than expected, and progress slowed to a snail’s pace. The armored breakthrough had yet to materialize.
The Allies ground their way forward, and the fighting was intense. With the German command being shocked by the ferocity of the attacks, Rommel’s sick leave was canceled, and he was called back from Germany to retake his position at the head of the Axis forces at El Alamein.
Rommel Returns

Rommel arrived in North Africa on the evening of October 25. The course of the battle was, however, difficult to change, and there was not much he could do to rectify the situation. Nevertheless, his presence lifted the morale of German and Italian troops. Spirited German counterattacks threatened to upset the Allied advance. With casualties mounting, Montgomery ignored the advice of one of his subordinates to call off the attacks.
Confusion reigned supreme among the dust and smoke, and Allied forces were pressed into making mistakes, many becoming easy targets for the well-prepared Axis defenses.
Despite the Allied blunders, the Axis forces were in bad shape. They took heavy casualties, and the troops were on half rations. They also only had enough fuel to last a few more days. Tanks and artillery pieces were being lost far too quickly, and the Allied numerical superiority was growing even further with these losses.
Rommel launched a counterattack to the north and met with middling success. Meanwhile, an oil tanker representing the last hope of refueling the Axis forces was sunk. Rommel told his generals that as a result of this action, it would be impossible to disengage from the battle, as there was no fuel to pull off such a maneuver. The war for North Africa would be decided at El Alamein.
Despite sustaining significant casualties, the Allied forces pressed their attack, relying on attrition to erode the German and Italian defensive capabilities. In the days that followed, battles raged back and forth as assaults by both sides generated counterattacks and a growing casualty count. By November 1, Axis forces had no more than 90 tanks left, while the Allies had 800.

With the German forces stretched to breaking point, Montgomery saw the opportunity to break through the German defenses, and Operation Supercharge was carried out. Focusing on the northern flank of the Axis defensive line, the Allies led a huge assault, supported by hours of intense artillery and aerial bombardments to suppress the German defense and prepare the way for Allied infantry and tanks to break through.
Rommel informed Hitler that the German and Italian positions could not be held for lack of supplies. Hitler replied that Rommel was to hold his position at all costs.
The fighting was horrendous, and heavy casualties were inflicted on both sides. The Germans counterattacked but could not force any significant change in Allied movements. Fighting continued, and on November 4, the breakthrough the Allies were looking for was achieved. In the north, the British, flanked by New Zealanders and Australians, cracked the German defenses.
Montgomery claimed after the battle, “One of the proudest achievements of my career was to have commanded the 9th Australian Division. I could not have won the battle of El Alamein in twelve days without that magnificent 9th Australian Division.”
The contribution played by the Indians is also significant and often left out of retellings of the stories of World War II. At El Alamein, the 5th Indian Brigade was instrumental in driving a wedge into the German positions on November 3, allowing other Allied units, the 1st and 7th Armored Divisions, as well as the 2nd New Zealand Division, to advance and complete the breakthrough.
With the Axis forces forbidden from retreating, the bulk of the army was captured. The defeat would have been complete had Montgomery not been so cautious. Various mechanized elements of the Axis forces managed to escape westwards towards new defensive positions.
What the Allied Victory Meant

For the Germans, the defeat was a disaster. The enormity of it was made even greater in the following months, as the Battles of Stalingrad and Kursk thrust thick nails into the coffin of Germany’s offensive potential. Without access to the oilfields in the Middle East, Germany would struggle throughout the rest of the war.
For the British, the victory signaled a massive turning point. It was the first major victory that altered the course of the war against Germany. For Britain, it was also a matter of honor. The Allied landings in French North Africa were due to take place in November. Operation Torch would be headed by American forces, and it was important that the British scored a major victory in order to prove to the Americans that Britain and its allies were capable of winning.
Winston Churchill famously said of the battle, “Before Alamein we never had a victory. After Alamein we never had a defeat.”
Casualties & Losses

Axis losses amounted to up to 9,000 dead and 15,000 wounded, while upwards of 30,000 were captured. In all, Germany and Italy lost more than half of the soldiers in the battle. Of major importance was the loss of armor. Of 527 tanks that took part in the battle, around 500 were destroyed or knocked out and irretrievable.
On the Allied side, casualties were similar. They lost 13,560 killed, missing, or wounded, and between 300 to 500 tanks destroyed.
The Germans and Italians lost 254 artillery pieces, while the Allies lost 111. In the air, the losses were even. The Axis forces lost 84 aircraft, and the Allies lost 97.
The Battle of El Alamein was undoubtedly one of the major turning points in the war. In scale, it was dwarfed by the battles on the Eastern Front, but its significance cannot be overstated.