For four years, the world witnessed a devastating conflict that would claim the lives of 22 million people. Whilst soldiers fought in bitter conditions on fronts all over Europe and beyond, much of the strategy was devised over grand maps in Field Marshals’ offices.
Whilst these maps hide the human cost of World War I, they show its truly impressive scale, and the grandiose ideas that were conceived to help break the never-ending stalemate.
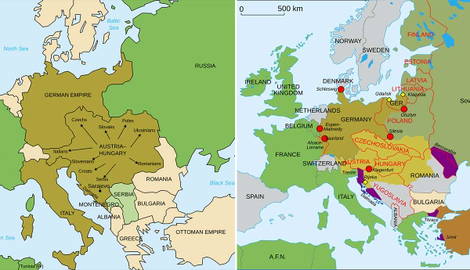
1. Europe in 1914

This map shows how a minor territory dispute between an empire and its neighbor degenerated into a full-blown conflict between the major powers of Europe.
The previous century had seen two large defensive alliance blocks form: the Triple Alliance (Germany, Austria-Hungary, Italy) and the Triple Entente (Britain, France, Russia). They believed that this system would create stability across the globe. This belief was proved catastrophically false when the assassination of Archduke Franz Ferdinand escalated into the Great Powers declaring war on each other.
The alliances would not prove to be rigid either. Italy would remain neutral at the outbreak of war, then switch sides. The Ottoman Empire, not part of either alliance system, would then join Germany and Austria-Hungary.
2. The Schlieffen Plan

Germany’s master strategy, the Schlieffen Plan, which made the High Command believe it could fight on two fronts, was proposed ten years before the outbreak of World War I.
The plan suggested a sweeping attack through Belgium, around the French defenses, to envelop the French army and quickly knock them out of the war. The German forces would then turn back eastwards to face what the German High Command believed to be the greater enemy, Russia, which would take longer to mobilize.
Whilst the strategy itself was meticulously detailed, its execution suffered from revisions and delays, meaning Germany was unable to achieve its objectives. The Schlieffen Plan was used by the victorious powers to blame Germany for starting the war.
3. Battle of the Marne

The Battle of the Marne was the closest France came to capitulation during the entire war. Germany was able to move rapidly through Belgium, forcing a general retreat of the French armies, aided by the British Expeditionary Force.
The German First and Second Armies came within miles of Paris. They were only driven back by last-ditch counterattacks by the British and French, before overstretched supply lines allowed the French to push them back.
The first month of the war was absolutely devastating, as both sides showed they were unprepared to fight a modern war. Indeed, nearly 10% of the soldiers who were killed during the entire war died in August 1914.
4. The Race to the Sea

After the initial German offensive and the subsequent Allied counterattack had stalled, both armies raced northwards in an attempt to outflank the other.
Neither side was able to break through. Thus, Germany and the Allied powers began establishing the trench networks that would stay almost stagnant for the rest of the war.
5. The Eastern Front

An often-forgotten part of World War I, the Eastern Front was much more fluid than the West. This was due to larger armies and more territory to cover. Trenches were shallowed, and combat was much more mobile.
The Russian army initially made huge advances, cutting through Austria-Hungary. However, they were driven back at the Battle of Tannenberg, slowly losing ground until 1916.
Like in the West, the early days of World War I saw a very high casualty rate on the Eastern Front. This was further exacerbated by poor planning by the Russians and the Austrians.
6. The Italian Front

Late to enter the war, Italy had initially declared itself neutral. However, secret negotiations with Britain and France caused it to join the Entente.
On the Italian Front, battles were mostly fought in the mountains on the Italian-Austrian border. The above map shows the territory changes through eleven different battles, all fought over the Isonzo River.
Perhaps the most stagnant front for much of World War I, it was finally the twelfth Battle of the Isonzo that saw significant movement. An Austrian breakthrough led to huge territorial gains and mass Italian desertions, with up to 400,000 soldiers disappearing and returning home.
7. The Balkan (Salonika) Front

The initial flashpoint of the war, Serbia initially resisted the Austrian invasion. With the Habsburg Empire’s forces soon drawn to other fronts, it seemed like the underdog kingdom could potentially have survived the war.
However, the Kingdom of Bulgaria’s intervention, on October 14, 1915, on the side of Germany, would prove decisive. Serbia would fall within a month. It would be two years before the Allies attempted to open another front in the region.
8. The Battle of Jutland

This map shows the Battle of Jutland, the only major naval clash of World War I. From the start of the war, the British had imposed a blockade on Germany, severely restricting imports of key goods and materials.
The smaller German navy attempted to break the blockade by trapping part of the British fleet. In the end, Jutland proved to be inconclusive. German media initially claimed victory as Britain suffered heavier casualties.
However, key German ships were forced to be scuttled, and the blockade remained in place. These supply issues would lead to the eventual German surrender in 1918.
9. The Battle of Gallipoli

This map shows how the Battle of Gallipoli, an attempt to open up a new front to relieve pressure in the West, turned into a disaster for the Allies.
Debates had raged amongst the members of the British Cabinet about whether to attack through the Balkans or the Ottoman Empire. Those in favor of Turkey, led by Winston Churchill, got their wish.
The whole invasion was poorly planned and poorly executed. Plans were changed when minefields could not be cleared, and the prepared Ottoman armies were able to hold the surrounding heights.
Half a million total casualties were suffered in the campaign before it was abandoned within a year.
10. The Battle of Verdun

This map shows the German attempt to break the French lines around the city of Verdun during the longest single battle of World War I.
Repeated German attacks would push the French army back towards the city, before desperate counterattacks began to reclaim the same territory. The same town, Fleury-devant-Douaumont, was captured sixteen times within two months.
With 300,000 men killed during the battle, Verdun became a symbol of French defiance and national pride for the rest of the war.
11. The Brusilov Offensive

This map shows the largest battle (in terms of manpower) of World War I, with an estimated two to three million casualties. It was also Russia’s greatest victory in the conflict.
Initially meant to draw German forces away from Verdun, a small offensive under capable general Aleksei Brusilov turned into a rout for Austria-Hungary. Its army was rendered almost inoperable and would struggle for the rest of the war.
Despite the victory, the Russian army suffered heavily. The boost in morale it gave was short-lived, and the failure to capitalize on these gains the following year helped trigger the February Revolution and then the October Revolution.
12. Battle of the Somme

Also used to distract Germany during Verdun, this British-led offensive has come to define World War I in the minds of many in the Commonwealth.
Using many inexperienced volunteers who had signed up during the early days of the war, the first day of the Somme was exceptionally lethal, with 60,000 casualties suffered by Britain alone.
The initial disaster was followed by the longest gain for the Allies since the First Battle of the Marne. Advancing over ten kilometers, they fell just short of their objective. The above map shows the contribution of Canadian divisions to the battle.
13. Operation Alberich: The German Retreat to the Hindenburg Line

After being defeated at Verdun and being driven back at the Somme, the German High Command decided to reevaluate its strategy.
This map shows how the German Army conducted a retreat to the heavily fortified Hindenburg Line. This new line shortened the front, making it easier to secure, and took advantage of much deeper and easier-to-defend trench networks.
The retreat caught the Allies off guard. They suddenly found themselves advancing forty kilometers, more than had been gained since September 1914 combined.
This strategic decision would help prolong the war significantly, as the usual stasis of trench warfare resumed.
14. The Nivelle Offensive (Second Battle of the Aisne)

The map above shows the French’s disastrous attempt to force a decisive battle through the so-called Nivelle Offensive, named after its commander, Robert Nivelle.
Nivelle hoped to break the Hindenburg Line permanently and ultimately end the war. Primarily focused around the Second Battle of the Aisne, initial advances found success. However, they were not substantial enough, and the offensive soon had to be canceled.
These results were incredibly costly for the French army. Nivelle’s disregard for casualties led to numerous mutinies amongst French battalions. The commander was quickly dismissed and replaced with Phillipe Pétain.
For the rest of 1917, France would fight the war on the defensive as it regrew its strength.
15. Colonial Warfare

The above map shows how World War I was a truly global conflict, due to the involvement of each Great Power’s empires.
Fighting was scarcer in the colonial territory. Instead, colonies supplied huge amounts of manpower to Europe, whether as the tirailleurs for France or the ANZACs for Britain.
The main strategy outside of Europe was to foment uprisings and disrupt production to hinder the domestic war effort. The Entente painted themselves as ‘liberating’ German subjects, yet only managed to capture German East Africa before the war was over.
Similarly, the war in Asia and the Pacific was limited to either naval combat or individual operations. This was primarily due to Germany’s inability to defend its colonial possessions, which meant it posed no significant threat to the Allies.
16. The Mesopotamian Campaign

Despite a great victory at Gallipoli, the rest of World War I was less positive for the Ottoman Empire.
After initial Turkish gains, British forces slowly ground through Ottoman territory in Sinai, Palestine, and Mesopotamia. They used revolts by discontented Arab groups to weaken Turkish defenders.
The map above shows how, even by 1916, the Allies were considering how to proceed if/when they won the war. The final treaty of Lausanne, signed in 1923, differed from this original division. Italy’s needs were largely ignored, while the Republic of Turkey was granted much larger borders.
The rest of the territory was roughly divided as the above map envisioned. This broke many of the promises the British had made to the same Arab rebels who had helped them be so successful against the Ottoman Empire.
17. The Treaty of Brest-Litovsk

This map shows the treaty that ended Russian involvement in the war. Germany demanded huge territorial concessions and large reparations.
The newly formed Soviet Union lost significant industrial capacity, coal reserves, and railway infrastructure. As the Bolshevik armies were busy fighting the Russian Civil War, their leadership could do little else but accept these demands.
When Germany eventually lost World War I, this treaty was nullified. However, it did establish the borders of present-day Russia, Finland, and many of the other former Soviet states.
18. The Spring Offensive

This map shows Germany’s attempt to win World War I before the bulk of US troops arrived. With a domestic crisis looming, the German High Command needed to force a victory soon.
Reinforcements from the now-defunct Eastern Front allowed German troops to break through demoralized British and French lines. Much of the territory that was lost at the Somme and other battles was regained.
However, once again, overstretched supply lines and a lack of coordination meant that the offensive stalled. Allied forces concentrated around key strategic points. Therefore, whilst Germany made significant territorial gains, as shown by the map above, much of that was of little strategic value.
Coupled with the heavy losses suffered in the Spring Offensive, this meant that it was easy for the Allies to deal the decisive blow both sides were hoping to score.
19. The Hundred Days Offensive

The Allies took advantage of these weak and overstretched German lines, quickly rallying to force them back towards the Belgian and German borders.
Fresh American troops helped overwhelm many of these scattered Germans, even managing to push through the Hindenburg Line.
The Central Powers completely collapsed. Allied forces made gains in France, Mesopotamia, Italy, and the Balkans. One by one, each of them would agree to an unconditional surrender, and so an armistice was called.
20. The Post-War Settlement

The post-war settlement imposed harsh conditions on the defeated powers and dramatically revised Europe’s borders. The primary driver of this change was the Treaty of Versailles.
The Austro-Hungarian Empire was divided, Germany’s territory and colonies were reduced, and several independent states were created. Other cities were given a plebiscite on which country they wanted to be a part of.
Although much of the post-war settlement was determined by the Treaty of Versailles, this map also shows how borders continued to be changed even after the treaty was signed.
The war between Greece and Turkey challenged the agreements Britain and France had made at the end of the war. Turkish victory greatly expanded the new republic.
Versailles and the subsequent treaties were very unpopular and would lead to more issues in subsequent decades. However, many of the modern borders we see in Europe today were established in the period after World War I.